Look, April 2026 is here, and my kitchen is already buzzing. Every year around this time, my team and I get together and basically just geek out over what we’re actually going to *cook* for the next few months. We’re talking real food, stuff we’re genuinely excited to make, eat, and probably make again. This isn’t some list of aspirational, ‘one day I’ll try that’ dishes; no, these are the 10 recipes our editors are excited to make in 2026 that are already hitting our shopping carts and cutting boards. I’ve personally already messed up a few of these at least once (you know, for science), so I’ve got the real talk for ya. Get ready for some seriously delicious, no-fuss meals.
📋 In This Article
- Spring’s Best: Asparagus & Lemon Ricotta Pasta (Because Pasta Never Fails)
- Crispy Air Fryer Lemon Herb Chicken Thighs (My New Obsession)
- Speedy Spicy Peanut Noodles (Better Than Takeout, Faster Too)
- Sweet & Tart: My Favorite Rhubarb Crumble (Spring Dessert FTW)
- Sheet Pan Sausage & Peppers with Roasted Potatoes (Easy Clean-Up!)
- No-Bake Chocolate Peanut Butter Bars (My Kids’ Fave, My Lifesaver)
- ⭐ Pro Tips
- ❓ FAQ
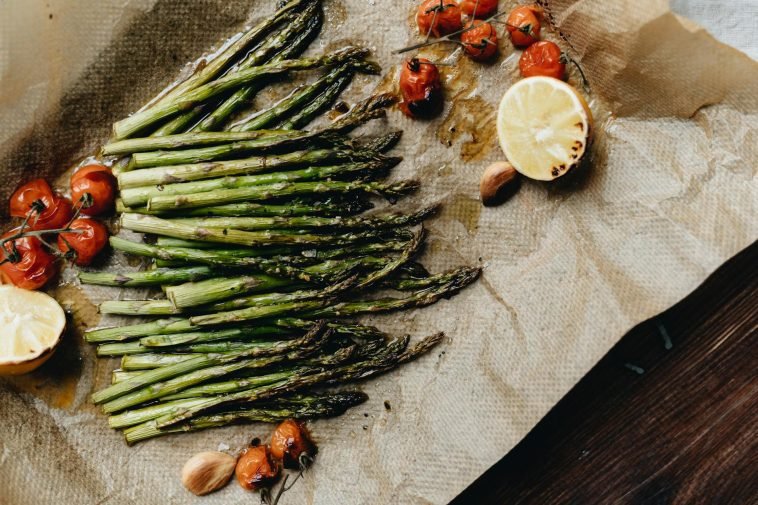
Spring’s Best: Asparagus & Lemon Ricotta Pasta (Because Pasta Never Fails)
Honestly, I’m a pasta fiend, and when spring hits, all I want is something fresh but still comforting. This Asparagus and Lemon Ricotta Pasta is it. It’s light, vibrant, and takes advantage of those beautiful, tender asparagus spears you’re seeing at Trader Joe’s for like $3 a bunch right now. I’ve tried this with regular ricotta, but the fresh stuff from the deli counter? Oh man, game changer. It makes the sauce so much creamier. Plus, it’s a one-pot wonder if you time it right with your pasta water. Seriously, it’s a weeknight hero, especially when I’m wiped after chasing my toddler around all day. I usually double the lemon zest because I’m obsessed with that bright flavor.
Quick Prep: Get Dinner on the Table in 20 Mins
This dish is super fast. You’ll chop your asparagus while the pasta boils, then quickly sauté it. The ricotta, lemon zest, and a splash of pasta water come together in a flash. My biggest tip? Have everything prepped *before* the pasta is done. We’re talking 5 minutes of active cooking once the pasta’s al dente. It serves 4, and I’d say it costs about $12-$15 total for ingredients, assuming you’ve got olive oil and salt already.
My Secret for Super Creamy Ricotta Sauce
Here’s where I messed up the first time: I just dumped the ricotta in. Don’t do that! Whisk your ricotta with a good splash of hot pasta water (maybe 1/4 cup) *before* adding it to the pan. It creates this silky, smooth sauce that coats every strand of pasta beautifully. I use Diamond Crystal kosher salt, about a teaspoon for the pasta water, and then season to taste with flaky sea salt at the end. Trust me, it makes a difference.
Crispy Air Fryer Lemon Herb Chicken Thighs (My New Obsession)
Okay, so I know everyone’s still obsessed with their air fryers in 2026, and for good reason! This recipe for Crispy Air Fryer Lemon Herb Chicken Thighs is hands down my favorite way to cook chicken right now. It gets that skin unbelievably crispy without any deep frying, and the meat stays super juicy. I grab boneless, skin-on thighs from Costco – they’re usually a great price, around $1.99/lb. I used to bake these, but the air fryer cuts the cooking time in half and the crisp factor is just superior. My kids even gobble these up, which, let’s be real, is a win in itself. You’ll want to make these on repeat, I promise.
The Marinade That Makes All The Difference
The key here is a quick, punchy marinade. Olive oil, lemon juice, fresh rosemary (or dried, but fresh is better if you have it), garlic powder, onion powder, and a good pinch of salt and black pepper. Let it sit for at least 30 minutes, or even overnight if you’re thinking ahead. It really infuses the chicken with flavor. This recipe serves 2-3 people, and it’ll run you about $8-$10 for the chicken and marinade ingredients.
Air Fryer Timing & Temperature for Perfect Crispy Skin
Preheat your air fryer to 375°F (190°C). Place the chicken thighs skin-side up in a single layer, making sure not to overcrowd the basket – you might need to do two batches. Cook for 18-22 minutes, flipping halfway, until the internal temperature reaches 165°F (74°C) and the skin is deeply golden and crispy. Don’t skip the preheating, it makes a huge difference for that initial crisp.
Speedy Spicy Peanut Noodles (Better Than Takeout, Faster Too)
I’m a sucker for takeout, but my wallet isn’t always on board, especially with inflation still doing its thing. So, I perfected these Speedy Spicy Peanut Noodles. They’re ready in about 15 minutes, seriously, and they taste just like your favorite pad Thai without all the fuss. We’re talking store-bought ramen noodles (just the noodles, ditch the seasoning packet!) and a killer sauce. I usually add some shredded carrots and cucumbers for crunch, and sometimes a handful of rotisserie chicken if I have it. It’s my go-to when I’m too tired to even think about cooking but still want something satisfying. And yeah, I use Jif creamy peanut butter. Don’t @ me, it’s the best for this sauce.
The Peanut Sauce You’ll Want on Everything
This sauce is everything. Creamy peanut butter, soy sauce (I use low sodium Kikkoman), rice vinegar, a touch of sesame oil, a squeeze of lime juice, a dash of sriracha for heat (or more if you’re brave!), and a tiny bit of maple syrup or honey. Whisk it all together with a splash of hot water until it’s smooth and pourable. You can make a big batch and keep it in the fridge for a week. This recipe serves 2-3, and costs maybe $6-$8, especially if you buy the ramen noodles in bulk at Walmart.
Don’t Overcook Your Noodles!
This sounds obvious, but when you’re rushing, it’s easy to do. Cook your ramen noodles according to package directions, but lean towards al dente. They’ll continue to soften a bit when you toss them with the warm sauce. Rinse them quickly with cold water after draining to stop the cooking and prevent them from sticking. That’s a pro move I learned the hard way after a few mushy noodle incidents. Nobody wants mushy noodles.
Sweet & Tart: My Favorite Rhubarb Crumble (Spring Dessert FTW)
Okay, so it’s April, which means rhubarb is finally in season! And if you know me, you know I’m all about a good crumble. This Rhubarb Crumble is one of those classic, comforting desserts that just screams spring. The tartness of the rhubarb with that sweet, buttery oat topping? Perfection. I usually buy my rhubarb at my local farmer’s market, but I’ve seen it popping up at Whole Foods and even some larger grocery stores like Kroger. This recipe is pretty forgiving, so don’t stress if your crumble topping isn’t perfectly uniform. Rustic is good, people! Serve it warm with a scoop of vanilla bean ice cream – it’s non-negotiable.
Balancing Rhubarb’s Tang with the Right Sweetness
Rhubarb can be *very* tart, so balancing the sugar is key. For about 4 cups of chopped rhubarb, I use 1/2 cup of granulated sugar and a tablespoon of all-purpose flour (to thicken the juices). You can adjust the sugar up or down slightly based on your preference, but start here. A tiny pinch of ground ginger or cinnamon also really complements the rhubarb without overpowering it. This crumble serves 6-8 people and costs around $10-$12 to make.
The Secret to a Perfect Crumble Topping
My trick for a perfectly crumbly, not too dense, topping? Use cold butter, cut into small cubes. Combine it with rolled oats, brown sugar, a little flour, and a pinch of salt. Then, use your fingertips to rub the butter into the dry ingredients until it resembles coarse crumbs. Don’t overmix! You want those distinct pieces of butter to melt and create pockets of crispness as it bakes. Bake at 375°F (190°C) for about 35-40 minutes.
Sheet Pan Sausage & Peppers with Roasted Potatoes (Easy Clean-Up!)
I live for sheet pan dinners. Seriously, who wants to wash a million pots and pans after cooking? Not me. This Sheet Pan Sausage & Peppers with Roasted Potatoes is a regular in my rotation because it’s ridiculously easy, super flavorful, and the clean-up is a breeze. I use Italian chicken or pork sausage – whatever’s on sale at my local Safeway – and I always throw in a mix of bell peppers (red, yellow, orange for color!) and sometimes an onion. The key is to cut everything roughly the same size so it cooks evenly. It’s hearty without being heavy, and you can totally customize the veggies if you want. Think zucchini, cherry tomatoes, or even some broccoli florets.
The Right Way to Roast Veggies for Max Flavor
Don’t overcrowd your sheet pan! That’s the biggest mistake people make. If your veggies are piled up, they’ll steam instead of roast, and you won’t get those delicious caramelized edges. Use two sheet pans if you need to. Toss your chopped potatoes, peppers, and sausage with a good glug of olive oil, dried oregano, garlic powder, salt, and pepper. Roast at 400°F (200°C) for about 30-35 minutes, flipping halfway. This serves 4 and costs about $15-$18.
My Go-To Sausage Pick and Why It Matters
I usually go for a mild Italian sausage, but a spicy one works great too if you like a kick. My absolute favorite is the Aidells Chicken & Apple sausage – it’s already cooked, so you just need to slice it and brown it up with the veggies. It adds a little sweetness that’s really nice. If you use raw sausage, make sure to slice it into 1-inch pieces and give it enough space on the pan to brown properly. And always check for doneness, of course!
No-Bake Chocolate Peanut Butter Bars (My Kids’ Fave, My Lifesaver)
Okay, so sometimes you just need a dessert that doesn’t involve turning on the oven, especially if it’s already getting warm out. These No-Bake Chocolate Peanut Butter Bars are pure nostalgia for me, and my kids go absolutely nuts for them. They’re rich, sweet, salty, and incredibly easy to throw together. I usually whip up a batch on a Sunday, and we have them for snacks all week. They’re great for school lunches too, if your school allows nuts. I use Reese’s peanut butter (the creamy one) for the filling because it’s got that perfect balance of sweet and salty. Seriously, you can’t mess these up.
The Perfect Base: Graham Cracker Crust FTW
The base for these bars is just crushed graham crackers, melted butter, and a bit of powdered sugar. Mix it all together and press it firmly into a 9×13 inch pan. I use the back of a measuring cup to get it really compact. Pop it in the fridge while you make the filling. This makes about 16-20 bars, and the ingredients (excluding pantry staples) will cost you around $10-12.
Melting Chocolate for a Smooth Top Layer
For the chocolate topping, I melt semi-sweet chocolate chips (Nestlé Toll House are my go-to) with a little bit of butter or coconut oil in the microwave. Heat in 30-second intervals, stirring well after each, until smooth. Don’t overheat it, or it’ll seize up and get clumpy. Pour it over the chilled peanut butter layer and spread it evenly. A sprinkle of flaky sea salt on top before it sets is a *must* for that sweet-salty combo.
⭐ Pro Tips
- Always use a kitchen scale for baking ingredients like flour and sugar. It’s way more accurate than measuring cups and prevents dense cakes or dry cookies. I snagged a decent one on Amazon for $18 last year.
- When buying fresh herbs, if you don’t use them all, store them like a bouquet: snip the ends, place them in a glass with an inch of water, and cover loosely with a plastic bag. They’ll last an extra week!
- Batch cook grains like quinoa or farro on Sunday. Cook 2-3 cups, then store in the fridge. You’ll have healthy bases for salads and bowls all week, cutting dinner prep time by 15 minutes easily.
- Don’t throw out stale bread! Cut it into cubes, toss with olive oil, garlic powder, and Italian seasoning, then bake at 375°F (190°C) for 10-15 minutes for amazing homemade croutons. Saves you $4-$5 a bag.
- My biggest game-changer: a good quality chef’s knife and keeping it sharp. A dull knife is dangerous and makes cooking miserable. I sharpen mine every few weeks with a pull-through sharpener from IKEA that cost me $12.
Frequently Asked Questions
What are some easy spring dinner ideas for 2026?
Easy spring dinners in 2026 often feature fresh produce like asparagus and rhubarb. Think sheet pan meals with seasonal veggies, light pasta dishes, or quick stir-fries. My Asparagus & Lemon Ricotta Pasta is a perfect example.
How much does it cost to make these recipes at home?
Most of these recipes cost between $6-$18 to make for 2-4 servings, depending on ingredients and where you shop. Buying in-season produce and using store brands at places like Walmart or Costco helps save money.
Is an air fryer really worth it for home cooking?
Yes, absolutely! An air fryer is totally worth it. It cooks things faster, gets food incredibly crispy with less oil, and is much easier to clean than a deep fryer. My Air Fryer Lemon Herb Chicken Thighs are proof.
What are the best cheap grocery stores in the US for home cooks?
For budget-friendly groceries in the US, I swear by Aldi and Trader Joe’s for unique finds, and Walmart for staples. Costco is amazing for bulk items if you have storage space. Shop sales, always!
How long do homemade no-bake bars last in the fridge?
My No-Bake Chocolate Peanut Butter Bars usually last about 5-7 days in an airtight container in the fridge. They’re great for meal prepping snacks for the week, and they hold up really well.
Final Thoughts
So there you have it, folks: the 10 recipes our editors are excited to make in 2026, straight from my kitchen to yours. These aren’t just theoretical dishes; these are the meals I’m genuinely cooking for my family, often on repeat. From speedy weeknight noodles to a comforting spring crumble, I hope you find something here that sparks joy in your own kitchen. Don’t be afraid to tweak them to your taste, or swap ingredients based on what you have. That’s the beauty of home cooking, right? Now go forth and make some delicious food!


GIPHY App Key not set. Please check settings