Okay, so real talk. Baked potatoes? They get a bad rap sometimes, right? Like, ‘oh, it’s just a side.’ But NO. Not in my kitchen, friend. A *properly* baked potato, loaded up with stuff, is a whole meal, a warm hug on a plate, and honestly, one of my absolute go-to comfort foods when I just can’t with cooking a complicated dinner. And when you throw in some super crispy broccoli and salty, crunchy bacon? Forget about it. This isn’t just a guide; it’s a manifesto for the ultimate baked potatoes with crispy broccoli and bacon, especially for you beginners out there. I’ve messed these up a million ways so you don’t have to – soggy skins, burnt bacon, mushy broccoli – I’ve seen it all. But I’ve also perfected it, and I’m telling you, this is a game-changer for weeknight dinners. You’re gonna love it.
📋 In This Article
The Humble Spud: Picking Your Potato Powerhouse
Look, not all potatoes are created equal for baking. You can’t just grab any old bag from Walmart and expect magic. The type of potato you pick is probably the most crucial step here, seriously. I’ve tried everything from Yukon Golds to those tiny red ones, thinking I could get away with it, but trust me, it’s a mistake. You want a potato that’s fluffy on the inside and can get super crispy on the outside. And for that, there’s only one real contender in my book. It’s not fancy, it’s not exotic, but it gets the job done every single time. And honestly, it’s usually the cheapest option, which is a win-win in my book, especially with grocery prices these days. I mean, who isn’t trying to save a few bucks? A 5lb bag of these usually runs me like $3-5 at my local grocery store, sometimes even less at Costco if I’m buying in bulk. Okay, I’m stalling. Here’s the deal.
Russets or Bust: Why I Swear By Them
You absolutely, positively need Russet potatoes. Also called Idaho potatoes in some places, these are the long, brown, starchy ones. Their high starch content means they get incredibly fluffy when baked, and their thick skin crisps up like a dream. Other potatoes, like Yukon Golds, are too waxy; they stay dense and don’t give you that cloud-like interior you’re after. I’ve tried to make it work, I really have, and it’s just not the same. Don’t compromise here, okay? Go for the Russets.
The Art of the Potato Pick: What to Look For
When you’re at the store, pick potatoes that are firm, with no soft spots, green patches, or sprouting eyes. Green spots mean solanine, which isn’t good for you, and sprouts just mean they’re old. Aim for medium to large potatoes, roughly 8-10 ounces each, so they cook evenly. If you pick a bunch of different sizes, some will be done way before others, and then you’ve got a problem. I usually grab a bag where they all look pretty similar in size, saves a headache later.
The Crispy Skin Secret (It’s Easier Than You Think!)
This is where most people go wrong, honestly. They just toss a potato in the oven and hope for the best. And what do they get? A sad, leathery skin. We want crispy, crunchy, almost chip-like skin here, because that’s half the fun of a baked potato! The secret isn’t some fancy technique or an expensive gadget. It’s literally just a few extra steps that take like, two minutes, tops. And trust me, those two minutes are going to change your baked potato life forever. I used to skip this, thinking it was overkill, but after one truly crispy potato, I was converted. It’s a non-negotiable step now, like brushing your teeth before bed. You just gotta do it. Preheat that oven, friend, we’re getting serious.
Don’t Skip the Scrub: Prep is Key
First things first: wash those potatoes thoroughly under cold running water. Scrub off any dirt with a veggie brush. You’re eating the skin, remember? So make sure it’s clean. Then, and this is important, dry them completely. Like, bone dry. Use a paper towel or a clean kitchen towel. Any moisture on the skin will steam the potato instead of letting it crisp up, and we absolutely do not want that.
Oil, Salt, and a Prickly Situation
Once dry, rub each potato with a little olive oil – maybe a teaspoon per potato. Then, sprinkle generously with coarse salt. I use Diamond Crystal kosher salt because it sticks well and gives great flavor. Finally, prick the potatoes all over with a fork, about 6-8 times. This lets steam escape, preventing them from exploding (which, yes, has happened to me) and helps them cook evenly. Put them directly on the oven rack, no foil! Foil steams them. Total prep time for this stage? Maybe 5 minutes. So worth it.
Bacon Bliss: Making it Extra Crispy (Without the Mess)
Okay, bacon. The star. The salty, crunchy counterpoint to our fluffy potato. Everyone thinks frying bacon is the only way, but honestly, it’s a huge mess and never gets *quite* as crispy as I like without constant babysitting. And who has time for that when you’re also trying to make dinner? My oven method is a revelation; it’s hands-off, less splatter, and gives you perfectly flat, super crispy strips every single time. I usually grab a big pack of Kirkland Signature bacon from Costco, because, well, it’s Costco and it’s a good deal, usually around $15-18 for four pounds. But any good thick-cut bacon will do. Thin-cut bacon can burn too fast, so watch out for that. This is where the magic happens, people. This is how you get that restaurant-quality bacon at home without smelling like a diner for three days.
Oven Bacon is the Best Bacon (Trust Me)
Line a baking sheet with foil (for easy cleanup!) and place an oven-safe wire rack on top. Lay your bacon strips in a single layer on the rack. Don’t overlap them! Put this into a *cold* oven, then set the temperature to 400°F (200°C). As the oven preheats, the bacon renders slowly, getting incredibly crispy. It takes about 15-20 minutes, depending on your bacon’s thickness. Just keep an eye on it after 15 minutes. Once it’s golden brown and crispy, pull it out, drain on paper towels, and crumble once cool.
The Air Fryer Shortcut: When You’re In a Rush
If you’ve got an air fryer, you’ve got another fantastic option for quick, crispy bacon. Lay strips in a single layer in your air fryer basket – you’ll probably have to do this in batches, which is the only downside. Cook at 375°F (190°C) for about 8-12 minutes, flipping halfway through. It’s super fast, great for smaller batches, and still less messy than pan-frying. I use my Ninja Foodi air fryer for this all the time when it’s just me and I only need a few strips.
Broccoli Breakdown: Getting that Perfect Char
Soggy broccoli is a crime against humanity. There, I said it. We’re aiming for tender-crisp florets with those lovely, slightly charred edges that taste sweet and nutty. It’s another super easy component to this meal, but again, a few tricks make all the difference. You want to use fresh broccoli, obviously. I usually grab a couple of heads from Trader Joe’s for like $2-3 each, or a big bag of florets from Costco if I’m feeling lazy. And that’s totally fine! Convenience is king sometimes. The key here is high heat and not overcrowding your pan. That’s the secret sauce, if you will. Don’t be afraid of a little browning; it’s flavor, not burning (unless you leave it in too long, then it’s just burnt, haha).
Chop It Right: Size Matters for Crispy Florets
Cut your broccoli into small, bite-sized florets. I’m talking maybe 1-inch pieces. If they’re too big, they’ll take ages to cook through and won’t get that nice crispiness. If they’re too small, they might burn. Aim for consistency in size so everything cooks evenly. Toss them with a tablespoon or two of olive oil, a good pinch of Diamond Crystal kosher salt, and some fresh black pepper. You can also add a little garlic powder if you’re feeling fancy.
Don’t Crowd the Pan! My Biggest Roasting Tip
Spread the seasoned broccoli in a single layer on a baking sheet. Seriously, give them space! If you pile them up, they’ll steam instead of roast, and you’ll end up with sad, mushy green stuff. Use two baking sheets if you need to. Roast at 400°F (200°C) for 15-20 minutes, or until tender-crisp and slightly charred around the edges. Give them a toss halfway through for even cooking. This step is annoying if you have a lot of broccoli, but worth it for the texture.
Building Your Masterpiece: Assembly Time!
Okay, all your components are ready: fluffy, crispy-skinned potatoes, crunchy bacon, and perfectly charred broccoli. Now comes the fun part – putting it all together! This is where you get to be creative, or just stick to the classics. I’m a big fan of the classic loaded potato, but you do you. The key is to make sure your potato is still piping hot when you load it up, so everything melts beautifully. Don’t let it sit around and get cold, or your cheese won’t melt right, and that’s just a tragedy. I usually time it so the potatoes come out of the oven right as the bacon and broccoli are done, or just a minute or two before. It’s all about that hot potato base, you know?
Fluffing the Spud: Don’t Forget This Step
Once your potato is out of the oven and perfectly baked (it should yield slightly when squeezed), carefully slice it open lengthwise. Don’t cut all the way through! Just enough to open it up. Then, using a fork, gently fluff up the interior flesh. This creates more surface area for butter and toppings, making it extra creamy and delicious. It’s a small step, but it makes a huge difference in texture. Seriously, don’t skip it.
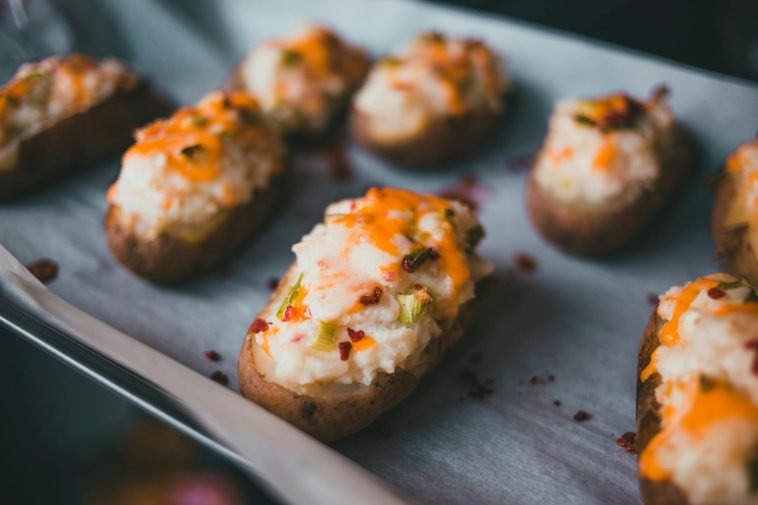
Loading Up: Cheese, Sour Cream, and Everything Nice
Now’s the time for toppings! I start with a pat of butter, letting it melt into that fluffy potato goodness. Then, a generous sprinkle of shredded cheddar cheese (I usually grab a block of sharp cheddar from Aldi and shred it myself; tastes way better than pre-shredded Kraft). Let it melt for a minute. Then, a dollop of sour cream (Daisy is my go-to, full-fat always!). Pile on your crispy broccoli and crumbled bacon. A little fresh chives or green onion if you’re feeling fancy, but it’s totally optional. Eat it immediately!
Cost, Time, and Why It’s Worth Every Second
So, you might be thinking, ‘this sounds like a lot of steps for a potato.’ And yeah, I get it. But honestly, most of the cook time is hands-off, and the prep is minimal. This meal isn’t just delicious; it’s surprisingly budget-friendly, especially if you’re smart about your grocery shopping. For a family of four, I can usually pull this whole thing off for under $15-20, depending on if I already have butter and sour cream on hand. That’s way cheaper than takeout, and way more satisfying. Plus, it feels like a real accomplishment when you pull that perfectly loaded potato out of the oven. It’s a comforting meal that doesn’t break the bank or require a culinary degree. It’s just good, honest food.
Budget Breakdown: How Much Does This Really Cost?
For 4 servings: 4 Russet potatoes ($3-5), 1 head broccoli ($2-3), 1 pack bacon ($6-10), cheddar cheese ($4-6), sour cream ($2-3), olive oil/salt/pepper (pantry staples, maybe $0.50). Total estimate: $17 – $27. You can definitely get this closer to the $15 mark if you shop sales or use store brands. It’s a super affordable meal compared to many others.
Prep & Cook Time: What to Expect
Prep time for everything (washing potatoes, chopping broccoli, setting up bacon): 15-20 minutes. Cook time: Potatoes take about 45-60 minutes at 400°F (200°C). Bacon takes 15-20 minutes in the oven (starting cold). Broccoli takes 15-20 minutes. So, you’re looking at about an hour from start to finish, with a lot of that being passive cooking time. It’s perfect for a weeknight if you get the potatoes going first.
⭐ Pro Tips
- Always start your bacon in a cold oven on a wire rack over foil. It renders slowly for maximum crispiness and way less mess. I swear by this method over pan-frying.
- Don’t store potatoes in the fridge! They convert starch to sugar, making them sweet and gritty. Keep them in a cool, dark pantry spot, like under the sink, in a breathable bag.
- If you’re making a bunch of potatoes, use an instant-read thermometer. The internal temp should be 205-210°F (96-99°C) for perfect fluffiness. No more guessing!
- To get extra crispy broccoli, make sure it’s super dry before tossing with oil, and don’t overcrowd the pan. Use two sheets if you have to; it’s the biggest mistake beginners make.
- For ultimate flavor, try rubbing your potatoes with bacon grease instead of olive oil before salting. It adds a smoky, savory punch that’s out of this world. I save mine in a jar in the fridge for just this reason.
Frequently Asked Questions
What kind of potatoes are best for baking?
Russet potatoes (also called Idaho potatoes) are absolutely the best for baking. Their high starch content makes them incredibly fluffy on the inside, and their thick skin crisps up beautifully. Don’t use waxy varieties like Yukon Golds; they stay dense.
How much does it cost to make loaded baked potatoes with bacon and broccoli?
You can make this meal for about $17-$27 for four servings, depending on store sales and brands. Potatoes are usually $3-5, broccoli $2-3, bacon $6-10, and cheese/sour cream around $6-9 combined. It’s a very budget-friendly dinner.
Is making baked potatoes with crispy bacon and broccoli worth the effort?
Yes, 100%! While there are a few steps, most of the cooking is hands-off. The crispy skin, fluffy interior, crunchy bacon, and charred broccoli are so satisfying. It’s a comforting, filling, and surprisingly affordable meal that feels special.
What are some other good toppings for baked potatoes?
Besides bacon and broccoli, I love adding sliced green onions or chives for freshness. Chili, pulled pork, sautéed mushrooms, or even just a spoonful of pesto can be amazing. Don’t be afraid to experiment with what you like!
How long does it take to bake a potato until it’s perfectly fluffy?
A medium-large Russet potato typically takes 45-60 minutes to bake at 400°F (200°C). It’s done when the skin is crispy and it yields easily when squeezed, or an internal thermometer reads 205-210°F (96-99°C).
Final Thoughts
So there you have it, my friends. The ultimate guide to baked potatoes with crispy broccoli and bacon. This isn’t just some recipe I found online; this is years of trial and error, a lot of burnt bacon, and even more delicious successes. It’s a meal that feels indulgent but is actually super simple to master, even if your cooking experience stops at instant noodles. I promise you, once you try these crispy-skinned, fluffy-centered spuds loaded with all the good stuff, you’ll never look back. Go grab those Russets, preheat that oven, and get ready for a seriously satisfying dinner. Your taste buds (and your family) will thank you. Now go make some magic!


GIPHY App Key not set. Please check settings