Alright, real talk: I’ve been on a quest for the *perfect* brownie for, like, ever. Seriously, it’s a deep dive into chocolatey goodness I take very, very seriously. For months, I’ve been baking my way through our blog’s five most popular brownie recipes, trying to crown a champion. My kitchen has basically been a war zone of cocoa powder, butter wrappers, and cooling racks. And let me tell you, it was a delicious, messy, utterly exhausting journey. But I did it! I found the absolute best brownie recipe, and it totally stole my heart. You’re gonna want to hear about this, especially if you’re as obsessed with fudgy, crinkly-topped brownies as I am. No more sad, cakey imposters, okay? This is the one.
📋 In This Article
- The Contenders: A Battle Royale of Brownie Styles
- The Brown Butter Brownie: A Flavor Adventure (Almost)
- The Winner! Behold, The Ultra-Fudgy, Crinkly-Topped Dream Brownie!
- Ingredients You’ll Need For The Winning Recipe (Don’t Skimp!)
- My Kitchen Fails & How You Can Avoid Them
- Serving Suggestions & Making Them Your Own
- ⭐ Pro Tips
- ❓ FAQ
The Contenders: A Battle Royale of Brownie Styles
So, what exactly did I put through the gauntlet? Our blog has some seriously beloved recipes, each with its own fan club. We had the super fudgy, almost molten brownie (the one I had a hunch would win, but no spoilers!), a classic chewy brownie that uses a mix of melted butter and oil, a more cake-like brownie for those who prefer a less dense bite, and then two wildcards: a ‘doctor up a box mix’ hack (because sometimes you’re just lazy, and I get it), and a brown butter version that promised extra depth. I baked each one at least twice, sometimes three times, just to make sure it wasn’t a fluke. And yes, my family and neighbors were thrilled. My waistline? Less so. But for science! I used Ghirardelli baking chocolate for all of them, because consistency matters, and I swear by Diamond Crystal kosher salt for everything. The differences, even with the same ingredients, were mind-blowing.
Fudgy vs. Cakey: My Personal Bias
I’m a fudgy brownie stan, full stop. If it’s cakey, it’s just chocolate cake, right? My ideal brownie has that dense, almost underbaked center, with a shiny, crackly top. The cakey ones, bless their hearts, just didn’t stand a chance in my book. But hey, some people love ’em, and that’s cool! I just don’t understand those people, honestly. It’s a texture thing.
The Box Mix ‘Hack’ – Is It Worth It?
Okay, the box mix one. I used the Ghirardelli brownie mix (the dark chocolate one, obviously) and added an extra egg yolk, a splash of brewed espresso, and a handful of extra chocolate chips. It was *good*, don’t get me wrong. It definitely improved the box mix. But it still tasted… like a doctored box mix. If you’re in a super rush, go for it. But if you have an extra 10 minutes, you can do so much better. Sorry, not sorry.
The Brown Butter Brownie: A Flavor Adventure (Almost)
Next up, the brown butter brownie. This one always sounds so fancy, doesn’t it? Browning butter adds this incredible nutty, caramel-y depth to baked goods. I mean, I brown butter for cookies all the time, it’s a total game-changer there. And it *did* add a really lovely, sophisticated flavor to these brownies. They had a beautiful aroma, and the taste was definitely more complex than the others. Here’s the thing though: the texture suffered a bit. They were a little less fudgy, a little more crumbly than I wanted. It’s like the brown butter wanted to be the star, and it kind of took over the whole show, including the texture. A solid B+ for flavor, but not my ultimate champion. I used unsalted Kerrygold butter for this, because it browns like a dream and the flavor is just superior.
My Brown Butter Confession
Browning butter is annoying. You have to watch it like a hawk, constantly stirring, or it goes from perfectly nutty to burnt in about 0.2 seconds. I’ve ruined so many batches. This step is annoying but worth it *if* you’re going for that specific flavor profile. For me, the extra effort didn’t quite push it into ‘winner’ territory this time.
The Chewy Contender: Good, But Not Great
Then there was the chewy brownie. This recipe used a mix of melted butter and a bit of vegetable oil, plus more brown sugar than white sugar, which is supposed to give it that bendy, chewy texture. And it did! They were definitely chewy. But they lacked the deep, intense chocolate punch I was craving. It was a good, reliable brownie, like your favorite comfy sweater. But I was looking for a showstopper, a sequined gown, you know?
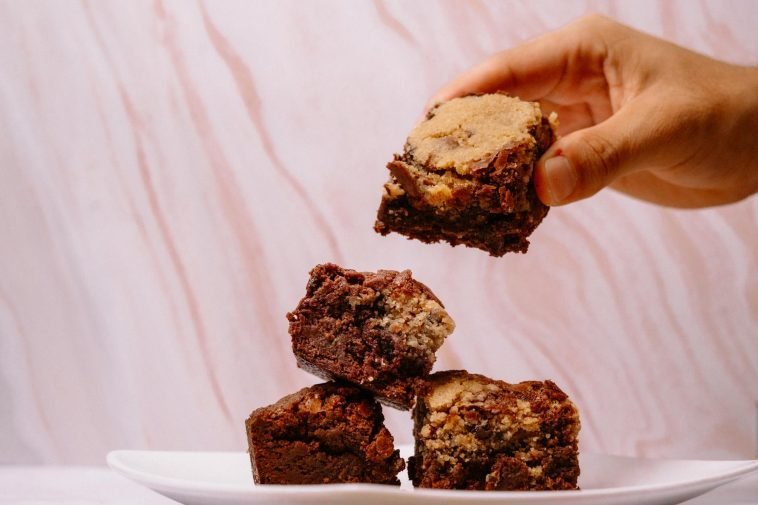
The Winner! Behold, The Ultra-Fudgy, Crinkly-Topped Dream Brownie!
Okay, drumroll please! The winner, the absolute best brownie recipe that stole my heart and made me want to bake nothing else ever again, is our *Ultra-Fudgy, Crinkly-Topped Brownie*. Seriously, you guys, this one is pure magic. It’s got that perfect balance: intensely chocolatey, almost gooey in the middle, with that signature shiny, crackled top that makes you feel like a total baking genius. Every single bite is just… *chef’s kiss*. It uses melted butter and a mix of unsweetened cocoa powder and semi-sweet chocolate chips, giving it layers of chocolate flavor. And the secret? A little bit of oil, just a touch, to keep it moist and tender. Plus, a crucial step: whipping the eggs and sugar until they’re pale and fluffy. It’s a small extra step, but holy moly, it makes all the difference for that perfect crinkle top. This recipe serves 12-16 (depending on how generous you are with your squares) and costs about $10-12 a batch, depending on your chocolate choice. Total time is about 45-50 minutes, including cooling.
The Secret to That Crinkle Top (It’s Not a Myth!)
You know that beautiful, paper-thin, shiny crinkle top everyone wants? It’s all about whipping the eggs and sugar. You need to beat them until they’re light, pale, and really thick. I use my stand mixer on medium-high for about 5-7 minutes. This creates a meringue-like layer that sets beautifully in the oven. Don’t skip it! It’s annoying, yes, but it makes these brownies go from ‘good’ to ‘OMG’.
Why Melted Butter is Your Fudgy Friend
Unlike creamed butter, which incorporates air and leads to a cakey texture, melted butter (and a touch of oil) creates a denser, chewier, fudgier brownie. It helps distribute the fat evenly without adding extra air. This recipe calls for gently melted unsalted butter, not hot, which is key. I usually melt it in the microwave for 30-45 seconds until just barely melted, then let it cool slightly.
Ingredients You’ll Need For The Winning Recipe (Don’t Skimp!)
Okay, so you’re ready to make these? Good! Here’s what you’ll need. Don’t go cheap on the chocolate, seriously. It’s the star of the show. I usually grab a bag of Ghirardelli semi-sweet chocolate chips (the 60% cacao ones are my favorite) from Walmart or Target, and then a good quality unsweetened cocoa powder. Hershey’s Special Dark works great, or if you’re feeling fancy, Valrhona is amazing but definitely pricier. You’ll also need unsalted butter (Kerrygold if you can swing it, otherwise whatever’s on sale at Costco), granulated sugar, a couple of large eggs, a tiny bit of vegetable oil (just a tablespoon or two), all-purpose flour, a pinch of baking powder (just a pinch!), and that crucial Diamond Crystal kosher salt. That’s it! Simple ingredients, but combined perfectly, they make magic. Prep time is about 15 minutes, bake time is 25-30 minutes.
My Go-To Chocolate Brands
For chips, Ghirardelli 60% cacao is my everyday hero. Trader Joe’s dark chocolate chips are also surprisingly good for the price point. For cocoa powder, Hershey’s Special Dark is always in my pantry. If I’m feeling bougie, I’ll splurge on a fancy Dutch-processed cocoa from a specialty store, but it’s not strictly necessary for these.
Why Baking Powder (Just a Touch!) Matters
You might be thinking, ‘Baking powder in a fudgy brownie? Isn’t that for cakey ones?’ And you’d be right, mostly! But a *tiny* amount, like 1/4 teaspoon, just gives the brownies a little lift without making them cakey. It prevents them from becoming too dense and brick-like, giving them just enough lightness to be perfectly tender. Trust me, it works.
My Kitchen Fails & How You Can Avoid Them
Look, I’ve had my share of brownie disasters. Overbaking is the number one killer of fudginess. You want that toothpick to come out with moist crumbs, not completely clean! If it’s clean, you’ve gone too far, and your brownies will be dry. Another thing? Not letting them cool completely. I know, I know, it’s torture. But cutting hot brownies is a messy business, and they’ll fall apart. Plus, the texture really sets as they cool. I usually bake them at night and let them cool on the counter overnight. Seriously, that’s the move. Also, don’t overmix the flour. Once you add the dry ingredients, mix *just* until combined. Overmixing develops the gluten, and you’ll end up with tough brownies. Nobody wants tough brownies. My biggest failure during this whole test was definitely an overbaked batch of the chewy ones. They were basically chocolate rocks. Learn from my mistakes, friends!
The Toothpick Test: What to Look For
When you insert a toothpick into the center, you want it to come out with moist, fudgy crumbs clinging to it. Not wet batter, but definitely not dry. If it comes out clean, they’re overbaked. Pull them out about 2-3 minutes *before* you think they’re ready.
Patience is a Virtue (Especially for Cooling)
This is probably the hardest part, right? But seriously, let them cool *completely* in the pan on a wire rack. For at least 2-3 hours, or even overnight. It lets them set up properly, intensifies the flavor, and makes for clean cuts. If you try to cut them warm, they’ll just crumble and make a mess. I speak from experience, many times over.
Serving Suggestions & Making Them Your Own
Okay, so you’ve got your perfect batch of fudgy brownies. Now what? Honestly, they’re amazing all on their own. But if you wanna get fancy, a scoop of really good vanilla bean ice cream (like Tillamook or Haagen-Dazs) is always a winner. A drizzle of homemade caramel sauce? Oh. My. Gosh. Or some flaky sea salt sprinkled on top right when they come out of the oven. That sweet and salty thing is just irresistible. You can also throw in some mix-ins! Walnuts, pecans, mini marshmallows (add them in the last 10 minutes of baking so they don’t burn), or even a swirl of peanut butter or cream cheese before baking. I’ve even done chopped up candy bars, like Snickers or Kit Kats, and they were wild. The base recipe is so solid, it can handle a little creativity. Just don’t go too crazy, you don’t want to overpower that amazing chocolate flavor.
Storage: How to Keep Them Fresh
Store these brownies in an airtight container at room temperature for up to 3-4 days. They actually get even fudgier the next day, it’s crazy. You can also freeze them! Wrap individual squares tightly in plastic wrap, then put them in a freezer-safe bag for up to 3 months. Thaw at room temp or give them a quick zap in the microwave.
Seasonal Swaps for Your Brownies
Since it’s April 2026 now, spring flavors are in! You could add a teaspoon of orange zest to the batter for a bright citrusy note. Or, once they’re cooled, top them with a light raspberry glaze. Peppermint extract is amazing around the holidays, obviously, but for spring, stick with something fresh and fruity. A little bit of almond extract instead of vanilla can also be really nice.
⭐ Pro Tips
- Always use a light-colored metal baking pan for brownies. Dark pans can lead to overbaked edges and underbaked centers. I use an 8×8 inch aluminum pan.
- For clean cuts, chill your brownies for at least an hour (or even in the freezer for 20 minutes) before slicing. Use a large, sharp knife, wiping it clean between each cut.
- A tiny splash of espresso powder (1/2 teaspoon) added to the batter won’t make your brownies taste like coffee, but it will seriously deepen and enhance the chocolate flavor. It’s my secret weapon!
- Don’t rely solely on the timer. Ovens vary wildly! Check your brownies a few minutes early, around the 22-minute mark, with the toothpick test.
- If you’re using unsweetened chocolate, make sure it’s good quality. Dropping an extra $2-3 on a better brand like Ghirardelli or Baker’s will make a huge difference in flavor.
Frequently Asked Questions
What’s the best type of chocolate for fudgy brownies?
For the absolute best fudgy brownies, use a combination of good quality unsweetened cocoa powder and semi-sweet chocolate chips (around 60% cacao). This gives a complex, deep chocolate flavor and a rich, gooey texture. Don’t use milk chocolate, it’ll be too sweet.
How much does it cost to make a batch of homemade brownies?
Making a batch of these fudgy brownies usually costs me about $10-12 USD. Flour, sugar, and eggs are cheap, but good butter and quality chocolate (Ghirardelli, Valrhona) are the main expenses. Buying in bulk at Costco helps cut costs.
Is making brownies from scratch actually worth the effort?
Absolutely, 100% yes! Box mixes are fine in a pinch, but homemade brownies, especially this winning recipe, are on a completely different level. The flavor, the texture, that perfect crinkle top – it’s worth every single minute of effort. You’ll taste the difference, I promise.
What’s a good alternative to vegetable oil in brownies?
If you don’t want to use vegetable oil, you can swap it for an equal amount of melted unsalted butter. It will still be delicious, though the vegetable oil does contribute to a slightly chewier, more tender crumb. Another neutral oil like canola or grapeseed would also work fine.
How long do brownies need to cool before cutting?
You really need to let brownies cool completely before cutting them. That means at least 2-3 hours at room temperature, or even overnight. If you’re impatient (like me!), you can pop them in the fridge for an hour. Cutting them warm makes them fall apart and messy.
Final Thoughts
So there you have it, folks! After a truly epic brownie battle, the Ultra-Fudgy, Crinkly-Topped Brownie reigns supreme in my kitchen. It’s everything I ever wanted in a brownie and more. That deep chocolate flavor, the gooey center, that perfect shiny top… it’s just unbeatable. If you’ve been searching for *the one*, I’m telling you, this is it. Go grab your ingredients, clear your schedule, and get ready to bake the best brownies of your life. And when you do, hit me up on Instagram and show me your beautiful crinkle tops! Seriously, you won’t regret making these. Your taste buds (and anyone you share them with) will thank you. Now, if you’ll excuse me, I think I have one last square hiding somewhere…

GIPHY App Key not set. Please check settings