You know how it is. You start with one brownie recipe, then you see another, then suddenly your kitchen looks like a chocolate war zone. Well, that’s pretty much my life. I’ve been on a quest for the *perfect* brownie for years, and honestly, the sheer number of amazing looking recipes on our blog was getting a little overwhelming. So, I did what any sane person would do: I decided to bake all five of our most popular brownie recipes back-to-back. It was a chocolate-fueled marathon, a true test of my willpower (and my waistline, let’s be real). And here’s the thing, one of these best brownie recipe contenders absolutely knocked my socks off. I’m talking fudgy, chewy, chocolatey perfection that made me question every brownie I’d ever eaten before. Let’s just say my heart now belongs to a brownie. Yeah, I said it.
📋 In This Article
- The Contenders: My Top 5 Brownie Battle Royale
- Chewy Edges & One-Bowl Wonders: The Mid-Tier Showdown
- And Then There Was One: My Heart’s True Winner
- Kitchen Confessions & Brownie Blunders: What I Learned
- The Secret Sauce: My Winning Brownie Recipe (Simplified)
- Beyond the Bake: Serving & Storage Tips
- ⭐ Pro Tips
- ❓ FAQ
The Contenders: My Top 5 Brownie Battle Royale
Okay, so before we get to the big reveal, let’s talk about the lineup. I picked the five brownie recipes that consistently get the most clicks and rave reviews on our site. These aren’t just random picks; these are the ones *you all* love. I baked them all in 8×8 metal pans (Nordic Ware, because they’re solid) because consistency matters, right? Each batch got exactly 30 minutes in my oven set to 350°F (175°C), then a cooling period before the ultimate taste test. I even made sure to use the same brand of unsalted butter (Kerrygold, because flavor!) and Ghirardelli unsweetened cocoa powder across the board to keep things fair. It was a serious scientific endeavor, I swear. And my poor husband had to eat a *lot* of brownies. Tough job, I know.
Recipe 1: The Fudgy AF Dream
This one promised maximum fudginess. It used melted butter and lots of chocolate chips, not just cocoa. Prep time was about 15 minutes, cook time 30, and then cooling for an hour. Overall, it cost me around $8-9 for the ingredients, shopping mostly at Walmart. It was definitely fudgy, like almost underbaked in the best way. My first bite was like, ‘whoa.’ But it was almost *too* rich for a whole piece. You know what I mean? Like, a small square was perfect, but a big one felt like a lot.
Recipe 2: The Surprisingly Cakey Contender
Next up, a recipe that leaned more towards a cake-like texture. It called for both cocoa powder and melted chocolate, plus a bit more flour and baking powder than the others. Prep time was 10 minutes, cook time 30, cool for an hour. Ingredient cost came in slightly lower, maybe $7-8. Honestly, I wasn’t expecting much from a ‘cakey’ brownie – I’m a fudgy girl, usually. But it was surprisingly good! Light, airy, and still super chocolatey. If you’re not into the super dense kind, this is a solid choice. But it wasn’t my soulmate brownie, just a really good friend.
Chewy Edges & One-Bowl Wonders: The Mid-Tier Showdown
Alright, moving on to the middle of the pack. These next two recipes represented different philosophies in brownie-making. One was all about that coveted chewy edge, a texture some people *live* for. The other was the ultimate convenience play: the one-bowl wonder. I’m always a fan of fewer dishes, so that one had a special place in my heart before I even started baking. But, you know, sometimes convenience comes at a cost, right? I tried to be impartial, but my inner lazy person was definitely rooting for the one-bowl recipe to pull ahead. Spoiler: it didn’t quite make it to the top spot, but it put up a valiant effort.
Recipe 3: The Chewy Edge Obsession
This recipe focused on a specific technique to get those super chewy edges and a crackly top. It involved beating the eggs and sugar for a *long* time until light and fluffy before adding the melted butter and chocolate. This step is annoying but worth it for the texture. Prep time was about 20 minutes (thanks, mixer!), cook time 30, cool for an hour. Cost was around $8. The texture was spot on – so chewy! But I felt like the chocolate flavor got a little lost in all that chewyness. It was good, but not mind-blowing chocolate good.
Recipe 4: The One-Bowl Lazy Day Lifesaver
My hopes were high for this one. One bowl! Less cleanup! It used cocoa powder, oil instead of butter, and a super simple mix-and-dump method. Prep time was like, 8 minutes, cook time 30, cool for an hour. Total cost was probably the lowest, around $6-7. You can use any neutral oil here, I grabbed some canola oil from Costco. Look, it was fine. It was a perfectly acceptable brownie for when you need chocolate *now* and don’t care about perfection. But it lacked the depth of flavor and that luxurious mouthfeel you get from butter and good chocolate. You can skip this if you’re lazy, I won’t judge, but it won’t win any awards.
And Then There Was One: My Heart’s True Winner
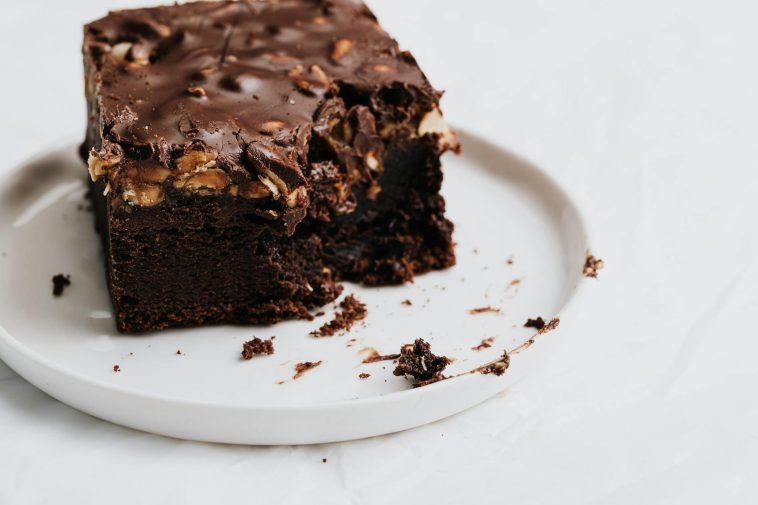
After a week of non-stop brownie eating (and a very understanding family), the results are in. And let me tell you, one recipe absolutely blew the others out of the water. It wasn’t the fudgiest, it wasn’t the chewiest, and it definitely wasn’t the easiest one-bowl wonder. But it was the *perfect* balance of everything. That’s the secret, I think. It had that dense, rich fudginess without being cloying, a delightful chewiness around the edges, and a crackly, glossy top that just screamed ‘eat me!’ I honestly didn’t expect to fall this hard. I’ve made it twice more since the official taste test, just because I couldn’t stop thinking about it. Yeah, it’s that good.
Why It Stole My Heart: The Perfect Balance
The winning recipe, let’s call it the ‘Classic Fudgy-Chewy Hybrid,’ just hit every single note. It uses a combination of melted butter, cocoa powder, *and* a bit of chopped dark chocolate (I used Ghirardelli 60% cacao baking bar, usually $3.50 at my local Kroger). This gives it a really complex, deep chocolate flavor. The texture is what really sealed the deal: super dense and fudgy in the middle, but with a satisfying chewiness toward the edges, and that signature crackly top. It’s not too sweet, either, which I really appreciate.
The Recipe Breakdown (Winner Only): Key Ingredients & Method
This recipe is a bit of a hybrid. It starts with melted butter and sugar, then adds eggs, vanilla, and then the dry ingredients. The secret, I think, is the precise amount of flour and the addition of that chopped dark chocolate which melts into the batter, adding extra richness and fudginess. It also calls for a mix of granulated sugar and a tiny bit of brown sugar, which helps with chewiness. It’s not complicated, but each step feels intentional and contributes to the final perfect bite.
Kitchen Confessions & Brownie Blunders: What I Learned
Okay, real talk. Even after years of baking, I still mess things up. This brownie challenge was no different. I had one batch that was definitely overbaked (lesson learned: set a timer and don’t get distracted by Netflix), and another where I got a little too enthusiastic with the mixing. But these mistakes, honestly, are how you learn. And when you’re baking five different recipes in a row, you start to pick up on the subtle differences that really make or break a brownie. It’s not just about the ingredients; it’s about the technique, the timing, and sometimes, just a little bit of patience. Trust me on this one, I’ve had enough crumbly, dry brownies to know what I’m talking about.
Don’t Be Like Me: Overmixing is a Crime
Seriously, once you add the flour, *stop mixing*. Just combine it until no dry streaks remain, then stop. Overmixing develops the gluten too much, and you end up with tough, cakey brownies, even if the recipe is supposed to be fudgy. I’ve done it, and it’s heartbreaking. Be gentle. Your brownies will thank you. A rubber spatula is your best friend for this step, not an electric mixer.
Pan Power: Material Matters, Seriously
I used metal pans for all my tests, and I stand by it. Glass pans absorb and retain heat differently, which can lead to uneven baking and often a softer, less chewy edge. If you *only* have glass, reduce your oven temp by 25°F (about 15°C) and keep a closer eye on them. But if you want those perfect edges, grab a good quality metal pan. Mine are Nordic Ware, and they’re usually around $15-20 at Target or online. Worth the investment, I promise.
The Secret Sauce: My Winning Brownie Recipe (Simplified)
Alright, you’ve waited long enough. Here it is, the recipe for the brownie that stole my heart. I’ve made a few tiny tweaks from the original blog post to make it even easier for you, based on my multiple test runs. This recipe serves 9-12 people, depending on how you cut them, and takes about 15 minutes of active prep time, 30 minutes to bake, and then an hour or so to cool. The total cost, if you’re buying quality ingredients (which you should for this one), is roughly $9-11. I usually grab my flour and sugar at Trader Joe’s, and my butter and chocolate at Costco or Kroger. You’ll want a good quality cocoa powder here, like Hershey’s Special Dark or Ghirardelli unsweetened. It makes a difference.
Ingredients You’ll Need (for the winner)
You’ll need 1 cup (2 sticks) unsalted butter, melted. 1 cup granulated sugar, plus 1/4 cup packed light brown sugar. 2 large eggs, room temp. 1 teaspoon vanilla extract (the good stuff!). 3/4 cup unsweetened cocoa powder (Hershey’s Special Dark is great). 1/2 cup all-purpose flour. 1/4 teaspoon Diamond Crystal kosher salt. And 1/2 cup chopped dark chocolate (60-70% cacao), I use Ghirardelli baking bars.
My No-Nonsense Method
Preheat your oven to 350°F (175°C) and grease an 8×8 metal baking pan. In a medium bowl, whisk together the melted butter, granulated sugar, and brown sugar until smooth. Whisk in the eggs one at a time, then the vanilla. In a separate bowl, whisk together the cocoa powder, flour, and salt. Add the dry ingredients to the wet, mixing *just* until combined – no dry streaks left, seriously! Stir in the chopped dark chocolate. Pour into your prepared pan and bake for 28-32 minutes. A toothpick inserted 1 inch from the edge should come out with moist crumbs, not wet batter. Let cool completely before cutting. This is the hardest part, but crucial!
Beyond the Bake: Serving & Storage Tips
So, you’ve baked the perfect batch of brownies. Now what? Waiting for them to cool is the absolute hardest part, but it’s essential for that clean cut and perfect texture. If you cut them warm, they’ll crumble and you’ll lose all that fudgy goodness. I usually pop mine in the fridge for 30 minutes after they’ve cooled on the counter for a bit, it makes slicing super easy. And, if you’re planning to share (or hoard, no judgment here), proper storage keeps them fresh and delicious for days. Nobody wants a stale brownie, right? Especially not after all that effort to find the best brownie recipe.
Cutting Like a Pro (Without the Drama)
Once your brownies are completely cool (and maybe a little chilled), use a sharp, non-serrated knife. For really clean cuts, wipe your knife with a damp paper towel or run it under hot water between each slice. I aim for 9 big squares or 12 smaller ones. If you’re feeling fancy, a little sprinkle of flaky sea salt on top before serving makes them look extra gourmet and really brings out the chocolate flavor. It’s a game changer.
Keeping Them Fresh: Storage Secrets
Store your brownies in an airtight container at room temperature for up to 3-4 days. Honestly, they rarely last that long in my house. You can also freeze them! Wrap individual brownies tightly in plastic wrap, then place them in a freezer-safe bag or container. They’ll keep in the freezer for up to 3 months. Just thaw them at room temperature for an hour or so whenever a chocolate craving hits. It’s like having fresh brownies on demand!
⭐ Pro Tips
- Always use room temperature eggs! It helps them emulsify better with the sugars and fats, leading to a smoother batter and better texture in your brownies.
- Don’t skip the salt. I use Diamond Crystal kosher salt, about 1/4 teaspoon for an 8×8 pan. It doesn’t make them salty, it just makes the chocolate taste *more* chocolatey.
- For an extra crinkly top, whisk your melted butter and sugars together for a full 2-3 minutes before adding eggs. It incorporates air and creates that beautiful glossy crust.
- If you’re using a dark metal pan, reduce your oven temperature by 25°F (15°C) to prevent overbrowning the edges. Dark pans conduct heat more efficiently.
- The one thing that made the biggest difference for me? Letting them cool *completely* before cutting. Seriously, walk away. Go watch an episode of something. Your patience will be rewarded.
Frequently Asked Questions
What’s the secret to making really fudgy brownies?
The secret to fudgy brownies is usually a higher fat-to-flour ratio, using melted butter or oil, and often less leavening (baking powder/soda). Don’t overbake them; they should still look slightly underdone in the center when you pull them out.
How much does it cost to make homemade brownies from scratch?
Making homemade brownies from scratch typically costs between $6 and $12 for an 8×8 inch pan, depending on the quality of chocolate and butter you use. A basic batch with decent ingredients usually runs about $8-9.
Are boxed brownie mixes actually worth it compared to homemade?
Honestly, for convenience, boxed mixes are fine. They’re quick, easy, and consistent. But for truly exceptional flavor and texture, homemade is always worth it. The quality of ingredients in homemade brownies just can’t be beat by a mix.
What’s the best type of chocolate to use for brownies?
For the best flavor, use a good quality unsweetened cocoa powder (like Ghirardelli or Hershey’s Special Dark) combined with chopped dark chocolate (60-70% cacao) or chocolate chips. Avoid milk chocolate for the main chocolate flavor; it’s too sweet.
How long do homemade brownies last if stored correctly?
Homemade brownies stored in an airtight container at room temperature will stay fresh for about 3-4 days. If you keep them in the fridge, they can last up to a week, or you can freeze them for up to 3 months for longer storage.
Final Thoughts
So, there you have it. My epic brownie journey, complete with triumphs, minor disasters, and a whole lot of chocolate. The ‘Classic Fudgy-Chewy Hybrid’ recipe truly earned its spot as my favorite, and I’m pretty sure it’ll become yours too. If you’ve been searching for that perfect brownie, the one that hits all the right notes – fudgy, chewy, deeply chocolatey, and with that irresistible crackly top – then you absolutely *have* to try this recipe. Go on, grab your ingredients. You won’t regret it. And hey, let me know how it turns out! Happy baking!


GIPHY App Key not set. Please check settings