Okay, so like, I’m gonna let you in on my absolute favorite weekend secret. This oven-baked skillet pancake? It’s seriously so good, you’ll want to make it every weekend. I’m not even kidding, I discovered this gem back in like, 2023, after a particularly disastrous attempt at flipping regular pancakes – you know the ones, where half of it ends up on the floor? Yeah, I’ve been there. But this thing, it’s a game-changer for lazy Saturday mornings. Especially now, in April 2026, when I’m trying to squeeze in every bit of spring sunshine before summer hits. It’s minimal fuss, maximum reward, and honestly, it looks super impressive without any extra effort. Trust me, your friends will think you’re some kind of brunch wizard. And it costs, like, less than a fancy coffee.
📋 In This Article
- Why This Skillet Pancake Will Be Your New Weekend Obsession
- Getting Your Gear Ready: The Cast Iron Must-Have
- The Batter: Simple Steps for Big Flavor (Don’t Overthink It!)
- Baking It Up: Oven Temps and Timing (The Fun Part!)
- Toppings Galore: Making it Your Own (Seasonal Goodness for April 2026)
- Troubleshooting & Common Oopsies (We’ve All Been There!)
- My Go-To Oven-Baked Skillet Pancake Recipe (Serves 4, about $6-7)
- ⭐ Pro Tips
- ❓ FAQ
Why This Skillet Pancake Will Be Your New Weekend Obsession
Look, I get it. The idea of a pancake you don’t flip sounds almost too good to be true, right? But this isn’t some weird science experiment; it’s pure, unadulterated genius. I’ve made this probably fifty times since I first stumbled upon it, tweaking little things here and there. And honestly, the biggest win is the hands-off baking. You throw it in the oven, walk away, and come back to this glorious, puffy, golden-brown masterpiece. No standing over a hot griddle, no uneven cooking, no sad, flat pancakes. Plus, it just *feels* special. You pull that hot cast iron skillet right to the table, dust it with some powdered sugar, and everyone just gasps. It’s a real moment, you know? And for me, someone who loves brunch but hates the mess, this is a total lifesaver. It’s also incredibly versatile, which we’ll get into, but the base recipe is just so solid.
The “No Flipping” Magic (Seriously!)
This is the big one. You pour the batter into a screaming hot, buttered skillet, and the oven does all the work. It puffs up beautifully, gets golden brown on top, and cooks through perfectly. No more trying to wrestle a floppy pancake with a spatula only to have it tear in half. That alone is worth the price of admission, if you ask me. It’s like magic, but it’s just physics, I guess. I’m still amazed every time it comes out of the oven.
Ingredients You Already Have (Probably)
The beauty of this oven-baked skillet pancake is its simplicity. You’re talking flour, eggs, milk, sugar, butter, and a pinch of salt. That’s it! I always have these on hand, so it’s my go-to when I want something delicious but don’t want to run to the grocery store. I usually use whatever all-purpose flour I have, often King Arthur or the Costco Kirkland brand, and whole milk because, well, it just tastes better here. You don’t need fancy stuff, just the basics.
Related Reading
Getting Your Gear Ready: The Cast Iron Must-Have
Okay, so here’s where we get into the nitty-gritty. You absolutely, positively *need* a good cast iron skillet for this. I’m talking a 10-inch or 12-inch skillet. I’ve tried it in regular non-stick pans, and it just doesn’t get that gorgeous, crispy edge or the even cook. The cast iron holds heat like a champ, which is crucial for that initial puff and getting a nice golden-brown bottom. My trusty Lodge 10.25-inch skillet (I got it for about $25 at Walmart back in 2020) is my MVP for this recipe. If you don’t have one, honestly, go get one. They last forever, and they’re not even expensive. Think of it as an investment in future deliciousness. Just make sure it’s well-seasoned, or you’ll have a sticky situation on your hands. And we don’t want that, trust me.
Why Cast Iron Isn’t Optional Here
Cast iron’s heat retention is the secret sauce. It gets super hot in the oven, and when you pour that cold batter in, it creates this incredible thermal shock that makes the edges crisp up beautifully and helps the whole thing puff. A flimsy aluminum pan just won’t cut it. You want that heavy, even heat. It’s like baking a perfect cookie, you need the right pan to get that edge.
Quick Seasoning Check-Up
Before you even think about batter, make sure your skillet is seasoned well. If food tends to stick to it, give it a quick re-seasoning. Just a thin layer of neutral oil (like grapeseed or vegetable oil), wipe off the excess, and bake it upside down in a hot oven (around 400°F / 200°C) for an hour. Let it cool slowly. This step is annoying but worth it, especially if you haven’t used your skillet in a while.
The Batter: Simple Steps for Big Flavor (Don’t Overthink It!)
This batter is ridiculously simple, but there are a couple of things I’ve learned that make a huge difference. First, don’t overmix. Seriously, just mix until everything’s combined. Lumps are fine, even preferred. Overmixing develops the gluten too much, and you’ll end up with a denser, chewier pancake, which is not what we’re going for here. We want light and airy, with those crispy edges. And second, let it rest. This is a step I used to skip when I was lazy, but it really does make a difference in the final texture. It gives the flour time to fully hydrate and the gluten to relax. So, just give it 10-15 minutes on the counter while your oven heats up. You can totally do that.
Dry First, Wet Second: The Golden Rule
Always mix your dry ingredients (flour, sugar, salt) thoroughly in one bowl. Then, in another bowl or a measuring cup, whisk your wet ingredients (milk, eggs, melted butter). This ensures even distribution of your leavening (though this recipe doesn’t use baking powder/soda, it’s a good habit) and prevents overmixing when you combine them. It’s just cleaner and more efficient.
Don’t Rush the Rest (It’s Important!)
After you’ve combined your wet and dry ingredients, let the batter sit for at least 10-15 minutes. This rest time allows the flour to fully absorb the liquid, leading to a more tender and evenly textured pancake. Trust me, if you skip this, it’ll still be good, but it won’t be *as* good. It’s like letting dough rise a little; it just makes everything better.
Baking It Up: Oven Temps and Timing (The Fun Part!)
Okay, so your batter’s rested, your skillet’s seasoned, now it’s time to bake! This is where the magic really happens. You need a hot oven – I’m talking 400°F (200°C) or even 425°F (220°C) if your oven runs a little cool. And you need to preheat that empty cast iron skillet right in the oven. This is crucial for that immediate puff. Don’t skip it! Once it’s smoking hot, carefully pull it out, drop in your butter, let it melt and sizzle, then pour in the batter. It’ll sizzle and bubble, and that’s exactly what you want. Back into the oven it goes for about 15-20 minutes. Keep an eye on it, because every oven is different, but you’re looking for that beautiful golden-brown puff.
Oven Prep: Hot and Ready
Preheat your oven to 400°F (200°C) with your empty cast iron skillet inside for at least 15-20 minutes. You want that skillet screaming hot. This ensures the batter starts cooking immediately, giving you that dramatic puff. It’s like a hot griddle, but oven-style. Don’t be shy with the heat!
The “Puff” Factor: What to Look For
When it’s baking, you’ll see the edges climb up the sides of the skillet, creating this impressive, almost bowl-like shape. The center will be puffy and golden. Once the edges are deep golden-brown and the center is set and lightly browned, it’s done. Don’t overbake, or it’ll get too dry. It’s usually around 15-20 minutes for me, but check at 15. The puff will deflate a bit when it comes out, and that’s totally normal.
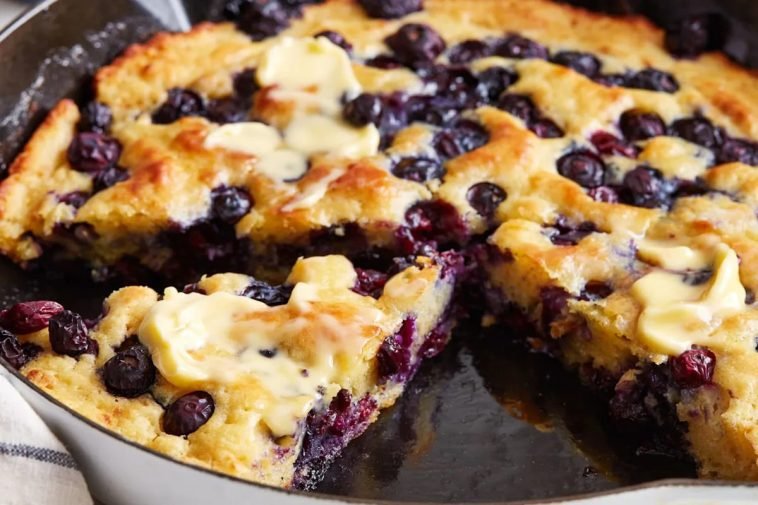
Toppings Galore: Making it Your Own (Seasonal Goodness for April 2026)
This is where you get to have some real fun! The base oven-baked skillet pancake is delicious on its own, but toppings take it to the next level. Right now, in April 2026, we’re seeing some gorgeous strawberries coming in from California, and blueberries are looking good too. Trader Joe’s usually has some great organic options that are reasonably priced. A handful of fresh berries tossed on top right after it comes out of the oven, maybe a dollop of whipped cream or crème fraîche, and a drizzle of real maple syrup? Chef’s kiss! But don’t limit yourself. I’ve done caramelized apples, sliced bananas with a sprinkle of cinnamon, even a savory version once with cheese and herbs. It’s your canvas, paint it however you like. Just don’t forget the powdered sugar dust – it makes everything look fancy.
Spring’s Best: Berries and Rhubarb
For April, I’m all about fresh berries. Sliced strawberries, raspberries, or blueberries are fantastic. If you’re feeling adventurous and can find some early rhubarb at your local farmer’s market or a good grocery store like Whole Foods, you can make a quick rhubarb compote to go with it. Just chop it up, cook with a little sugar and a splash of water until it breaks down. So good!
Beyond Syrup: Get Creative
While maple syrup is classic, consider other drizzles! A lemon glaze (powdered sugar + lemon juice), a fruit compote, or even a chocolate sauce if you’re feeling decadent. You can also add mix-ins to the batter itself – chocolate chips, a handful of berries, or a sprinkle of orange zest. Just remember, anything too heavy might prevent it from puffing as much.
Troubleshooting & Common Oopsies (We’ve All Been There!)
Okay, so even though this recipe is pretty foolproof, sometimes things go a little sideways. I’ve definitely had my share of ‘oops’ moments in the kitchen. Once, I forgot to preheat the skillet, and the pancake came out super dense and sad. Another time, I used expired baking powder (even though this recipe doesn’t use it, I was experimenting with another version!), and it just didn’t rise. So, don’t worry if your first attempt isn’t Pinterest-perfect. It’s still gonna taste amazing. But knowing what to look out for can save you some frustration. Most problems stem from either not enough heat or messed-up proportions.
Why Didn’t My Pancake Puff?
The most common culprit is a not-hot-enough skillet or oven. Make sure that cast iron is smoking hot when you pour in the batter. Also, ensure your eggs are fresh and your milk isn’t super old. Sometimes, if the batter is too thin (too much milk), it won’t hold its structure as well. Don’t open the oven door too early either; let it do its thing.
Sticky Situations: Preventing Disaster
If your pancake is sticking, it’s almost always a seasoning issue with your cast iron or not enough butter. Make sure you use a generous pat of butter (or a tablespoon of oil) in the hot skillet right before pouring the batter. Swirl it around to coat the bottom and sides thoroughly. A well-seasoned pan and enough fat are your best friends here.
My Go-To Oven-Baked Skillet Pancake Recipe (Serves 4, about $6-7)
Alright, here it is, my tried-and-true recipe for the oven-baked skillet pancake. This makes a decent-sized pancake, perfect for 2 hungry people or 4 if you’re also serving bacon and eggs alongside. Prep time is literally 5 minutes, plus 15 minutes rest. Cook time is 15-20 minutes. So, you’re looking at about 40 minutes from start to finish. Not bad for a show-stopping brunch, right? I usually double the recipe if I have guests over, just use a bigger skillet or two smaller ones. And honestly, it’s so inexpensive to make, especially compared to going out for brunch. You’re saving yourself like $30-40 right there! So, let’s get cooking!
Ingredients You’ll Need:
1 cup (120g) all-purpose flour (I use King Arthur’s unbleached)
2 tablespoons (25g) granulated sugar
1/2 teaspoon Diamond Crystal kosher salt (or 1/4 tsp table salt)
3 large eggs
1/2 cup (120ml) whole milk
1/4 cup (60ml) melted unsalted butter, plus 1 tablespoon for the skillet
Powdered sugar for dusting
Your favorite toppings (berries, maple syrup, whipped cream)
The Super Simple Steps:
1. Preheat your oven to 400°F (200°C) with your 10 or 12-inch cast iron skillet inside. Let it heat for at least 15-20 minutes.
2. In a medium bowl, whisk together the flour, sugar, and salt.
3. In a separate bowl, whisk the eggs, milk, and 1/4 cup melted butter until well combined.
4. Pour the wet ingredients into the dry ingredients. Whisk just until combined. Lumps are okay! Don’t overmix. Let the batter rest for 10-15 minutes.
5. Carefully remove the hot skillet from the oven. Add the remaining 1 tablespoon of butter and swirl to coat the bottom and sides. It should sizzle immediately.
6. Pour the batter into the hot skillet. Immediately return it to the oven.
7. Bake for 15-20 minutes, or until deeply golden brown and puffed. It’ll deflate a bit, don’t worry.
8. Remove from the oven, dust generously with powdered sugar, and serve immediately with your favorite toppings!
⭐ Pro Tips
- Always use room-temperature eggs and milk. It helps the batter come together more smoothly and contributes to a better puff. I usually set them out 30 minutes before I start.
- For a richer flavor, brown the 1/4 cup of butter slightly before melting it. It adds a nutty, deep taste that’s seriously next-level. Just watch it carefully so it doesn’t burn!
- If you want to make it ahead, you can mix the dry ingredients the night before. Then just add wet ingredients and let it rest in the morning. Saves you like 2 minutes, but hey, every second counts on a sleepy Saturday!
- Don’t crowd the pan with too many toppings before baking. If you want to add fruit *into* the pancake, only add a small handful just after pouring the batter. Most toppings are best added after it comes out.
- My biggest game-changer tip: a tiny splash of vanilla extract (like 1/2 tsp) in the wet ingredients makes a huge difference. It just rounds out the flavor so beautifully. I use Nielsen-Massey brand.
Frequently Asked Questions
What’s the difference between a Dutch baby and an oven-baked skillet pancake?
Honestly, not much! They’re essentially the same thing. A Dutch baby is just a fancy name for this type of oven-baked pancake. Mine is just a slightly simpler, less fussy version that’s become my personal go-to.
How much does it cost to make a skillet pancake from scratch?
For one 10-inch skillet pancake (serving 2-4), you’re looking at about $6-7 USD for the ingredients, assuming you have pantry staples like flour and sugar. Fresh berries might add another $2-3, but it’s still way cheaper than brunch out.
Is an oven-baked skillet pancake actually worth the effort?
YES, absolutely! It’s minimal effort for maximum deliciousness and visual impact. It takes less active time than flipping individual pancakes and looks so much more impressive. Trust me, it’s a weekend winner.
What’s the best pan for an oven-baked skillet pancake?
A well-seasoned cast iron skillet, 10 or 12 inches, is hands down the best. My Lodge 10.25-inch has been perfect for years. It holds heat so well and gives you that perfect crispy edge.
How long does it take to cook an oven-baked pancake?
Once the oven and skillet are preheated, the pancake itself bakes for about 15-20 minutes. Total time, including prep and batter rest, is usually around 40 minutes, which is super quick for a homemade brunch.
Final Thoughts
So there you have it, my absolute favorite oven-baked skillet pancake recipe. I’m not gonna lie, I used to be a total pancake purist, but this thing has converted me completely. It’s perfect for those mornings when you want something special but don’t want to work too hard. Seriously, give this a try this weekend. You’ll be amazed at how easy it is and how incredible it tastes. Dust it with powdered sugar, pile on some fresh April berries, and drown it in real maple syrup. You won’t regret it. And then, like, text me and tell me how it went. I wanna know! Happy brunching, friends!

GIPHY App Key not set. Please check settings