Disclosure: This post may contain affiliate links. Purchases through these links support our site at no extra cost to you.
Look, I know what you’re thinking. Why spend four hours making a bowl when you can grab one at Target for $5? But hear me out. There’s something therapeutic about getting clay under your fingernails on a Tuesday night. I tried this last week using some air-dry clay I found at Walmart, and honestly? It’s addictive. You don’t need a fancy pottery wheel or a kiln to learn how to make a bowl from scratch. You just need a bit of patience and a decent podcast to keep you company.
📋 In This Article
Gather your gear without breaking the bank
You don’t need an expensive studio setup. I grabbed a 2lb block of DAS air-dry clay from Walmart for about $8.99. You’ll also want a small bowl of water, a plastic knife (the ones from takeout work fine), and a sponge. Seriously, that’s it. My kitchen table was covered in newspaper, and I felt like a kid in art class again. It’s way cheaper than those $60 pottery classes everyone is obsessed with in 2026. Just make sure your workspace is clear because this stuff gets dust everywhere. If you have a rolling pin, grab that too, but a smooth glass bottle works if you’re like me and refuse to buy extra gadgets.
Related Reading
Picking the right clay
Stick to air-dry clay for your first attempt. It doesn’t need to be fired in a kiln. I use the white version because it’s easier to paint later. If you buy the gray stuff, it looks cool but makes your hands look like a coal miner’s. Expect to spend maybe $10 total for supplies if you don’t have water or a knife lying around.
The pinch pot method is your best friend
If you’re a beginner, don’t try to be a professional sculptor. Just roll a ball of clay about the size of a tennis ball. Stick your thumb in the middle, but stop before you hit the bottom. Now, slowly pinch the walls while rotating the ball in your hand. This is the part where I always mess up. If you pinch too hard, the wall gets thin and cracks. If you don’t pinch enough, you’ve got a heavy, lumpy mess. It takes about 20 minutes to get the thickness right. Don’t stress if it looks wonky—that’s the ‘handmade’ charm, right? Just keep smoothing it out with a damp sponge as you go.
Smoothing out the cracks
Your fingers are your best tools. Dip them in water—just a tiny bit—and rub the surface. This seals the clay and stops it from cracking while it dries. I usually spend 10 minutes just smoothing the rim.
Patience is actually a requirement
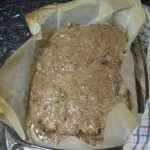
This is the annoying part. Once your bowl is shaped, you have to let it sit. I left mine on the counter for 48 hours. If you try to paint it too soon, it will crack or get mushy. Seriously, don’t touch it. I put mine on a cooling rack so air could get to the bottom, which helped it dry evenly. If you live in a humid place like Florida, give it an extra day. I know it’s tempting to start decorating, but the clay needs to be bone-dry. If it feels cold to the touch, it’s still damp. Wait until it’s room temperature.
Finding the perfect spot
Put your drying bowl somewhere out of reach of pets or kids. My cat tried to ‘inspect’ my first bowl and left a permanent paw print in the side. Not a great look for a minimalist piece.
Painting and sealing your masterpiece
Once it’s dry, it’s time to make it look decent. I use acrylic paint from the craft aisle at Trader Joe’s or any local hobby shop. Two thin coats are better than one thick one. After the paint dries, seal it with a clear acrylic spray or a water-based varnish. This is mandatory if you want to actually put anything in it. Since these aren’t food-safe, I use mine to hold my keys, spare change, or that pile of rubber bands that lives in my junk drawer. They’re super cute for organizing, and you’ll feel like a genius every time you look at them.
Making it water-resistant
If you want to use it for real food, you’re out of luck with air-dry clay. Stick to holding dry items like jewelry or snacks in wrappers. The sealer keeps the paint from chipping off on your stuff.
⭐ Pro Tips
- Keep a small spray bottle of water handy to keep the clay moist while you work, but don’t over-saturate it or it turns into soup.
- You can save about $50 by using a glass jar to roll out clay instead of buying a dedicated ceramic roller.
- Beginners often make the walls too thick at the bottom, which makes the bowl take forever to dry and leads to cracking.
Frequently Asked Questions
How long does it take for air-dry clay to dry?
It usually takes 24 to 48 hours depending on the humidity in your home. I always wait at least two full days to be safe before I start painting.
Is making your own bowl actually worth it?
Yes, if you want a fun, low-stress activity. It’s not about saving money, it’s about the satisfaction of making something with your own hands for under $15.
Best air-dry clay for beginners?
I highly recommend DAS air-dry clay. It’s consistent, easy to find at Walmart or Amazon, and it doesn’t crumble while you’re trying to shape it.
Final Thoughts
Look, it’s not going to be perfect, and that’s okay. My first bowl had a weird wobble and a fingerprint on the bottom, but I still use it every day. It’s a fun way to spend a few hours away from a screen. Grab some clay, clear off your table, and just see what happens. You might be surprised at how much you enjoy it. Now, go get your hands dirty!

GIPHY App Key not set. Please check settings